Finger-picking means to pluck the strings with the right hand rather than strum them. Finger-picking allows an alternative to strumming. Most often the thumb plucks the Bass strings which are the sixth, fifth, and fourth strings. The index finger plucks the third string, the middle finger plucks the second string, and the ring finger plucks the first string. The right hand baby finger is not used in finger-picking.
It is important to keep the thumb out and pointing towards the neck of the guitar. It strikes the strings on the side of the thumb and never should be behind the index finger or in the 'cup' of the hand. The rest of the fingers should pluck upwards on the fingertips using the finger joints for energy. The hand itself should not move very much and be fairly relaxed.
Some players rest the baby finger or baby finger and ring finger on the guitar body. This isn’t recommended as it ties up fingers that could be used in a better way. Some players use a thumbpick for finger-picking. Try one out and see if you like it. Either way is fine.
Many styles of music rely on finger-picking. Classical music in particular. Finger-picking allows a player to add more to a song than strummed chords. Bass lines, melodies, harmony, and musical phrases can be employed separately or together while finger-picking.
The lessons are designed to go through in a step by step fashion. They will give you the ability to enjoy basic finger-picking and go on from there. It is best to learn these lessons before attempting the finger-picking arrangements in other parts of the MIS indexes.
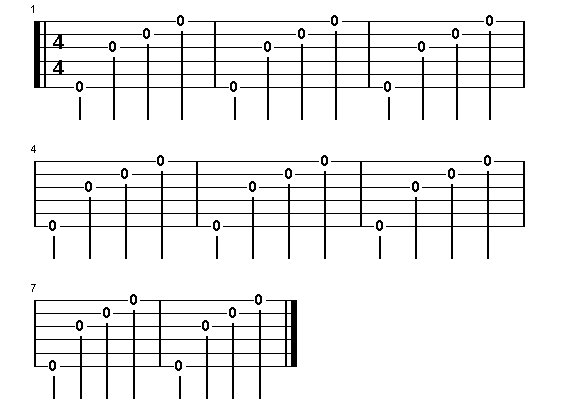
Arpeggio means 'broken chord'. When you are finger-picking that is what is happening. The chord is being broke up rather than strummed all at once. The main patterns used to break the chords up are here. These patterns are finger-picking patterns that are either in 3/4 or 4/4 time. The Bass note of each chord will always be on the first beat of each measure.
Place your right hand thumb on the sixth string. Make sure it is the side of your extended thumb that is touching the string, not just the tip of the thumb. Behind the thumb rest the tip of your index finger on the third string. Now rest the middle finger on the second string and the ring finger on the first string. The finger joints should each be slightly bent so the fingers are in a ‘C’ shape. Not bent so much though that they appear ackward when plucking the strings. Unlike the fingers, the thumb should be fairly straight.
Now that the fingers and thumb are resting on the strings you are ready for the next part of the exercise. Play the sixth string with the thumb. Next play the third string with the index finger, the second string with the middle finger, and the first string with the ring finger. After this continue by resting the fingers on the strings again and playing the strings again. Continue to practice this until it is easy to do.
Although the fingers don’t rest on the strings very much while finger-picking, it is good to rest the fingers on the proper strings and then begin to play the song. This puts the fingers in the proper position to start. It is very important to realize that while you are learning to finger-pick your thumb will tend to slide back into the cup of the hand region and displace your whole hand position.
You must train the thumb to stay in front of the fingers. Observe your thumb while finger-picking, when the thumb goes back stop playing and realign the fingers by resting them properly on the strings and again start over.
|
Finger Position Exercise |
|
|
Finger Positioning |